Dead Sled Wrenchers
Tech
Clean a Mikuni Roundslide Carb
|
So
You've got a
newer sled, its got a Mikuni roundslide carb and the sled won't run.
Maybe it'll load up and backfire through the carb, maybe the motor runs
but when you give it throttle it cuts out. Whatever the reason you need
to clean that carb. If you've read the article on the Tillotson rebuild
you might wonder why we're cleaning the Mikuni but rebuilding the
Tillotson. Well the Mikuni is a much easier carb to fix and probably
you aren't going to need any new parts. I say probably, the one
exception is the bowl gasket, if this is your first time cleaning this
carb plan on replacing the bowl gasket. If you've replaced the gasket
in the last couple years you're probably okay. |
||
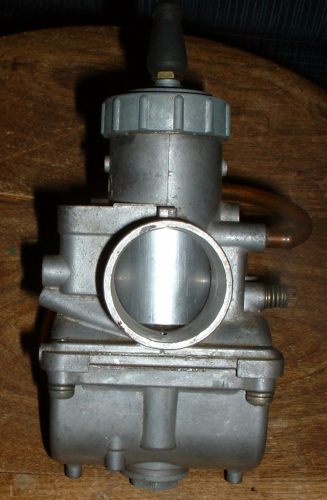
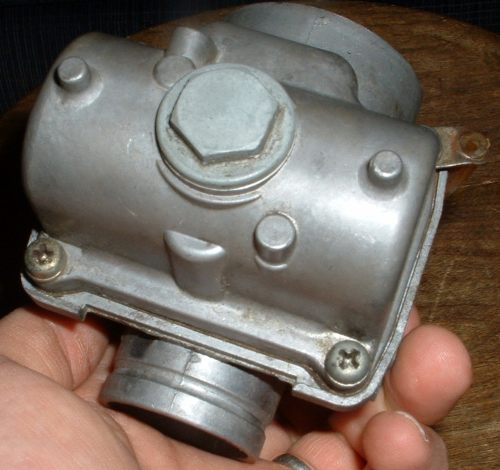 Fig 1. Mikuni Roundslide carb Fig 2. Exterior fuel bowl |
List of tools/parts: 1.Service Tool Kit for Mikuni VM
carbs: 2. 12mm wrench: 3. Non-rebound hammer or rubber mallet: Whaddya mean you don't have a non-rebounding hammer? This is a good time to get one. 4. Penetrant: 7. Rubber gloves: 8. Shop Vac: Optional: 11. Fuel filter 12. New fuel line 13. Fuel pickup strainer |
|
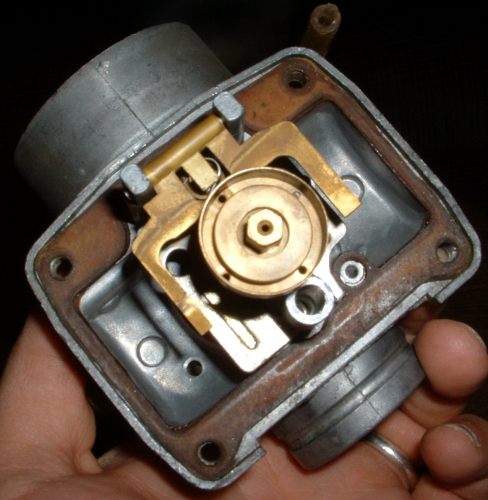 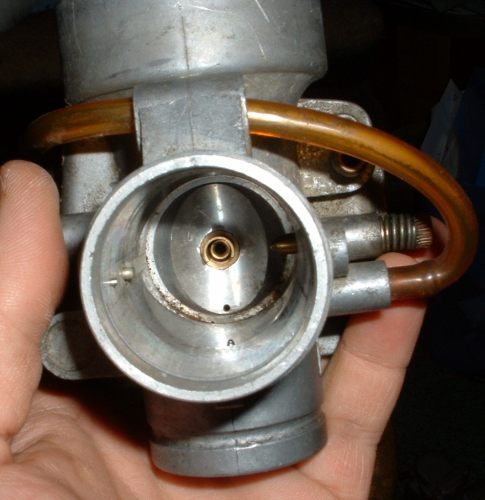 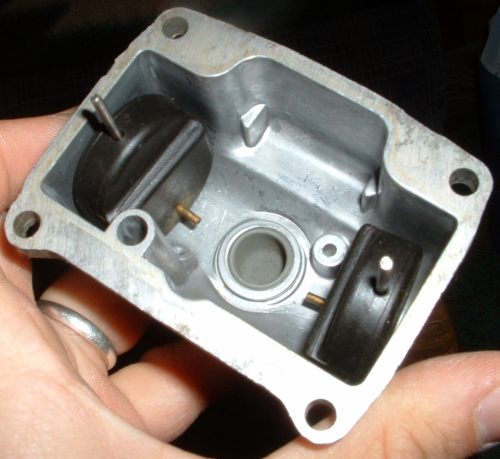 Fig 3. Fuel bowl removed Fig 4. Slide bore Fig 5. Interior fuel bowl |
|
|
|
With the carb upside down in the bowl take your phillips screw driver and break loose the 4 screws that hold the bowl onto the carb, don't pull them out yet, just break 'em loose. If one of them wants to strip tap your screwdriver into the screw with your hammer and try again. If it still wants to strip flip the carb rightside up squirt some PB Blaster into the screw hole and let the whole thing sit for an hour, then try again. If it still wants to strip get some small vicegrip pliers, grab the screw head and work it free that way. Try not to break the screw if you can help it. Don't try to heat the carb its got gas in it remember!
Now
lets ponder what we've got. Look at the carb bowl first, inside there
are two black things about the diameter of a quarter but alot thicker.
They ride on metal posts which are supposed to be topped with plastic
stoppers but alot of times the stoppers have been lost. These are
floats and serve to monitor the amount of gas in the bowl. They've got
metal bits sticking horizontally out of the bottom, make sure you
always put them back in the same way.... At the very bottom of the carb
is usually a threaded plug which is the drain. Some machines like my
TX-L have a length of fuel line. The idea here is that crud and water
will settle down into the length of fuel line and not get drawn into
the jet. However your carb is setup spend some time cleaning the bowl.
If the gasket tore when you took the bowl off its quite possible some
of it stuck to the bowl, clean it off with a razor blade but be sure
not to scratch the mating surfaces. Spray the bowl with your carb
cleaner real good and set it aside. |
||
| Now
everything should be good and clean, take a good long look at that bowl
gasket. Is it broken? Is it old and hard? Is it coming apart? If that
gasket is even slightly questionable replace it. Take your existing
gasket to your local sled shop and compare it to the ones in the book.
Get an extra, you might break one or something, they're not real
expensive. Right, lets examine that mounting flange. If this flange fails either the carb will fall off the motor or it'll leak air and burn a piston. The outside of the flange will usually be weather checked, thats okay, feel around inside it, are there any cracks inside? Cracks inside are bad and indicate a flange that wants replacing. If theres any doubt replace it. While we're looking lets check out the choke plunger. Sometimes the beanie on the end of the cable strips off the cable. In which case replace the whole assembly. I've found that the handles on the new choke cables are made of really cheap plastic. Keep your old handle and pin, move them to the new assembly. |
A note on gasket goop: I never use any gasket goop in a carb, if somethings warped badly enough that it won't fit tight without some gasket goop the carb is too badly beat to be rebuilt, replace it. Used carbs can be found on the web pretty easily. |
|
| Oh
the airbox, we were going to get back to the airbox... Take a look
inside, see how many mouse or chipmunk nests are in there. Take your
shop vac and suck all that crud out. Turn the box up and shake it,
shoot some carb cleaner in there and swab around with a paper towel
until its clean. On the TX-L I had to spend alot of time cleaning the
airbox because ants (ants, of all things!) had made a home in the seat
and had dragged that seat foam into the airbox. The foam was getting
dragged into the carb and keeping it from starting. My Blizzard 5500MX
had airbox right full of leaves and fluff that plugged the carbs. I
didn't know how to clean carbs then so I ended having to sell
the
sled. If I'd cleaned the airbox before I started running the sled it
wouldn't have been a problem. Reassembly: Reassembly is the reverse of the above.... Heh, thats a good one huh? Okay if you had to take the needle and seat out put the seat back in with your nut driver, put the needle in, put the spring on, put the arm back in place and drive the pin back in. Put the high speed jet back in, but your new bowl gasket on (hint hint) and the bowl next to it. Put the 4 screws in but down run them in real tight just snug them up. Once all 4 are snug then one at a time tighten them good. Not too tight you don't want to break something, too loose and it'll leak. I tighten until the tendons pop out of my wrist just a little. Its easier to get right if you've got a new gasket. (Get the hint yet?) Right, thats sorted, back to the sled. Put in your new carb flange, its held on with 2 allen nuts. With the screw on the band loose push the carb into the flange. The flange has a ridge in it that matches a detent around the carb body, match 'em up good. You'll know its right when you can turn the carb in the flange and it doesn't tend to unscrew. Then tighten up the screw so the band is tight. Remember the flange failing? The same stuff will happen if the band is loose so get it TIGHT but don't rip the flange... Put the slide back into the top of the carb, it only goes one way, screw the top on. While you're screwing the top down put your finger down the carb throat to make sure the slide is seated, if it won't go down all the way try to wiggle the slide back and forth so it'll go all the way in. If you can't get it to seat pull it apart and try again. Last step put the choke plunger into its hole, again this can take some wiggling. Tighten the nut down so it won't leak. Hook your fuel lines up. You did get new fuel lines didn't you? C'mon now, they're like $0.10 a foot, you only need like 2 feet. A new fuel filter is a real good idea while you're at it. Once its all hooked up pull it over, it'll take a couple pulls to get gas to fill the carb bowl, you might want to put a little premix down the carb throat to make it run for a second to help pull gas. At this point things should be running good. If they aren't either theres something wrong with your carb or you didn't get it clean enough, pull it off and clean it again... After you've run the engine a bit to prove you did a good job shut 'er down and put the airbox back on. You can't run without the airbox without rejetting the carb. If you do you'll get to much air through the carb and the engine will run lean and burn itself up. The carbs connect to the airbox with little rubber boots, sometimes the boots want to fall into the box and can be troublesome. Spend the time to get the boot on so it seals good, remember too much air, leans out the mix and burns down the engine. Anyway, you'll notice that we haven't changed any carb settings here, I assume through all of this that the sled ran before and the carb is just gummed up with last year's gas. If the sled ran before it sat the steps above should make it run again. Theres no promises of course, there could be other issues... So good luck, have fun and keep the shiny side up. |
||